
Last Updated October 2026
- A basic cleaning kit, some elbow grease and about 30 to 60 minutes can noticeably clear up most cloudy or yellowed headlights.
- A UV-protectant coating can help keep your headlights clearer for longer.
- Cloudy or yellowed headlight lenses are almost always caused by years of UV exposure and oxidation, plus abrasion from road grime.
- Clouding and yellowing can dim your headlights and cut your visibility at night.
You can clean cloudy, yellowing car headlights yourself with dish soap and water, a mild abrasive like toothpaste or baking soda or a headlight restoration kit. Finishing with a UV-protectant coating can help keep them clear longer.
Headlights clouded by years of UV exposure scatter light instead of focusing it on the road ahead. They can cut your visibility at night, when crash rates are already higher than during the day. Headlights that let more light reach the road have been proven to reduce nighttime crashes.
Why does cleaning your headlights matter?
- Better visibility and safety. A hazy lens lets less light reach the road. According to the Insurance Institute for Highway Safety (IIHS), headlights that let less light through because of their design or aim mean higher nighttime crash rates. Likewise, a cloudy or oxidized lens blocks and scatters light that would otherwise reach the road. And night driving already carries a higher fatality rate than daytime driving.
- Legal and inspection requirements. Cracked, discolored or heavily clouded headlights can keep your vehicle from passing a safety inspection in one of the roughly 14 states that still run periodic vehicle safety inspections. Check your local DMV to see if yours is one of them.
- Looks. A clear set of headlights is a low-cost way to make an older car look newer. (For more ideas, see these pro secrets to detailing a car.)
What makes headlights turn cloudy and yellow?
Most headlights today are made of polycarbonate plastic, not glass, and are far more vulnerable to the causes of cloudiness and yellowing.
- UV exposure and oxidation. Years of sun exposure wear down the plastic lenses’ original protective coating. Once it’s gone, UV rays oxidize the plastic itself, causing the surface to yellow and develop micro-roughness or, in extreme cases, actual crazing.
- Dirt, grime, gravel and road debris. Driving leaves a film of dust, bugs and grime on the lens, and fine debris can make tiny scratches that scatter light rather than letting it pass through cleanly.
- Chemical reactions. Roadway salt and other de-icers, cleaning products and waxes can contain chemicals that react with the plastic and speed up clouding.
How to clean your headlights, step by step
This guide covers surface haze, the yellow or cloudy build-up on the outside of the lens. If your headlight looks foggy or wet on the inside, or the lens itself is cracked, you may have a seal or housing issue that needs a mechanic or body shop.
For cleaning, start with the gentlest method that fits how cloudy your headlights actually are, and work up from there only if you need to. Here’s a quick way to tell which stage you’re starting from:
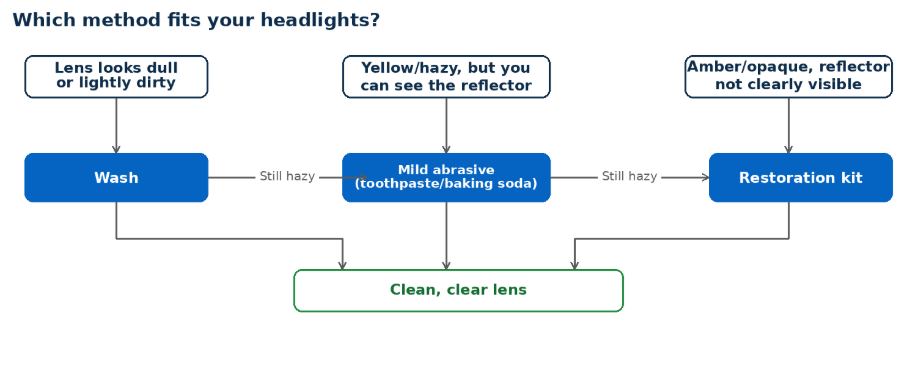
At any stage, if a method doesn’t get you the clarity you want, move to the next one rather than repeating it.
Gather supplies
Depending on the method you choose, you’ll want:
- Dish soap and water
- Microfiber cloths
- Painter’s tape
- A mild abrasive — toothpaste or a paste of water and baking soda
- A headlight restoration kit (available at most auto parts stores).
- A UV-protectant sealant (if you’re using a kit, it probably comes with one)
Option 1: Wash only (if your headlights are lightly dull)
Wash lenses with dish soap, water and a microfiber cloth to remove dirt and grime. This can improve clarity if the haze is mostly a dirty buildup rather than oxidation. Finish with the UV-protectant step below.
Option 2: Wash, then use a mild abrasive (visible yellow or haze, reflector still visible)
Wash the lens, then tape off the surrounding paint and any trim or bezel around the headlight to keep from scratching chrome, painted trim and body paint. Rub a small amount of toothpaste or a baking-soda-and-water paste onto the lens in circular motions with a soft cloth. Rinse and dry, then check the results in direct light. This method can help with mild yellowing but typically isn’t enough for heavy oxidation. Finish with the UV-protectant step below.
Option 3: Restoration kit (amber, opaque or reflector not clearly visible)
A kit typically starts with a chemical activator, not a soap wash, to break down your headlight’s old protective coating. Then you wet-sand the lenses with multiple (usually two or three) grits of sandpaper, progressing from coarser to finer, and then a polishing compound. Follow the kit’s instructions closely, since sanding too aggressively, sanding one spot too long or skipping a grit step can make the lens look hazy even after polishing. Most kits also include their own UV-protectant sealant as a final step.
4. Apply a UV-protective coating
Once the lenses are clean and dry, apply a UV-protectant coating or sealant. This will help your headlights stay clearer longer. Without it, oxidation can start again within months.
Pro tips
- Skip household abrasives beyond toothpaste or baking soda. Stronger chemicals and abrasive cleaners can further damage the lens.
- Don’t sand aggressively unless you’re following a restoration kit’s instructions. Removing too much material can create new haze or cloud spots.
- Tape off surrounding paint and trim before you start to avoid scratches or chemical damage.
- Work in the shade on a cool surface. Direct sun can cause cleaning products to dry too fast and streak.
- Wear gloves and eye protection when using restoration compounds or sanding.
Headlights aren’t the only reason you can lose visibility on the road. If your windows fog up in cold or humid weather, our guide to defogging your windshield can help. Staying on top of small maintenance issues like cloudy headlights is one way to look out for yourself on the road, alongside having the right car insurance in place.
The information contained in this page is provided for general informational purposes only. Read our editorial standards for Insurance Questions and other content. We make no representations or warranties of any kind, express or implied. This does not refer to any specific insurance policy and nothing herein is intended to replace or modify any terms in your actual policy.
Farmers may also provide information on topics that are not directly about insurance policies or coverage that we believe could be helpful to you. Information in such articles is not meant as professional advice, and any reliance you place on such information is therefore strictly at your own risk.
Related articles
Does Car Insurance Cover Hail Damage?
Comprehensive car insurance can help cover hail damage to your vehicle. Learn more d tips for protecting your car.

What These Auto Pros Know About Adding Years to a Car’s Life — and You Should, Too
Why do some cars stay safe and reliable for years longer than others? These car pros say it’s more about the owner’s habits than good engineering.

How to Get Your Car Out of the Mud
Stuck in the mud? Learn how to get your car out safely, when to call for help and how to avoid getting stuck again.
